I found an old memory card that had some material that I had planned on posting that I had long forgotten about. So maybe it might help some of you guys who like to do things themselves. Since my Dad was so good working with wood, I picked up a lot of things from him that I'm going to pass along to you guys that may help you as well. This walkthrough isnt' just for old AK's 
In this case, I wanted to doll up an old AK stock because I was wanting to get a saiga 7.62x39 and convert it and wanted as much of a show piece as a shooter. So far, other things has stood in my way of that, but I haven't given up all hope of it happening yet.
I started with an old WASR surplus stock and used 220 grit sandpaper to smooth it and take most of the dark brown stain off of it. This was no small feat in itself considering the rough condition of the old surplus/import sets. Another important note that whoever made the stock to begin with must not have gotten the memo on, sand WITH the grain and not against it. :roll:

Since it will be going on a Russian rifle, and like many of you being a product of the cold war, I wanted a red hue presentation stock like you would likely see on an AK guarding the Kremlin.
So that should tell you why I did it the way I did. This project would likely make the "AK purist" cringe. But that's OK, I'm doing it the way I remember an AK looking when I was a kid.
After sanding, I soaked it in scarlet red RIT dye as per their instructions. (Yes, the same kind we used tie dying T shirts back in the 70's)
You use scalding hot water and a cup of salt, stirring occasionally for an hour so I would have good coverage. Boiling water isn't only recommended for the dye, but it also pulls any small dings out of the wood as a side effect.

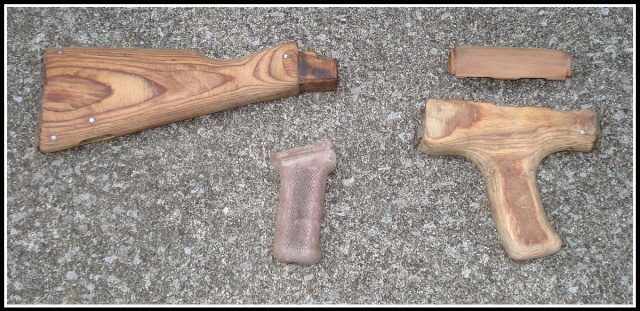
After rinsing in cold water until the runoff was clear, and after air drying, here is what the wood looked like before clear coating.

For anyone who may want to give it a "camo" appearance, a dark green RIT dye would be perfect for that.")
After waiting at least overnight for any remaining water to seep out of any cracks and crevices, it's time to clearcoat and seal it with Polyurethane. Since I wanted a presentation piece, I used clear gloss, but satin gloss isnt' as shiny and matte has very little shine at all to it if that's more to your liking.
After each clear coat is dry (up to 3 coats) use the extra fine steel wool to scuff the entire pieces between coats. This step may seem insignificant, but it's what gives the wood the "wet glass" look I was going for and even though the directions calls for 220 sand paper, trust me, the steel wool will give you a better finished product.

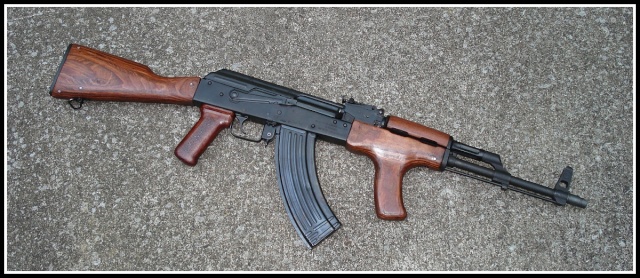
In the end after everything is said and done, I think the color turned out to be exactly what I was going for. It didn't look like a beet or strawberry like some may would've expected it would look like. But you can definately see the reddish tint I wanted now and the stock no longer looks like a piece of plywood that someone wiped a camel's butt with


Now to get a nice Russian Saiga 7.62x39 to go with the stock and convert it
In this case, I wanted to doll up an old AK stock because I was wanting to get a saiga 7.62x39 and convert it and wanted as much of a show piece as a shooter. So far, other things has stood in my way of that, but I haven't given up all hope of it happening yet.
I started with an old WASR surplus stock and used 220 grit sandpaper to smooth it and take most of the dark brown stain off of it. This was no small feat in itself considering the rough condition of the old surplus/import sets. Another important note that whoever made the stock to begin with must not have gotten the memo on, sand WITH the grain and not against it. :roll:
Since it will be going on a Russian rifle, and like many of you being a product of the cold war, I wanted a red hue presentation stock like you would likely see on an AK guarding the Kremlin.
So that should tell you why I did it the way I did. This project would likely make the "AK purist" cringe. But that's OK, I'm doing it the way I remember an AK looking when I was a kid.
After sanding, I soaked it in scarlet red RIT dye as per their instructions. (Yes, the same kind we used tie dying T shirts back in the 70's)
You use scalding hot water and a cup of salt, stirring occasionally for an hour so I would have good coverage. Boiling water isn't only recommended for the dye, but it also pulls any small dings out of the wood as a side effect.
After rinsing in cold water until the runoff was clear, and after air drying, here is what the wood looked like before clear coating.
For anyone who may want to give it a "camo" appearance, a dark green RIT dye would be perfect for that.
After waiting at least overnight for any remaining water to seep out of any cracks and crevices, it's time to clearcoat and seal it with Polyurethane. Since I wanted a presentation piece, I used clear gloss, but satin gloss isnt' as shiny and matte has very little shine at all to it if that's more to your liking.
After each clear coat is dry (up to 3 coats) use the extra fine steel wool to scuff the entire pieces between coats. This step may seem insignificant, but it's what gives the wood the "wet glass" look I was going for and even though the directions calls for 220 sand paper, trust me, the steel wool will give you a better finished product.
In the end after everything is said and done, I think the color turned out to be exactly what I was going for. It didn't look like a beet or strawberry like some may would've expected it would look like. But you can definately see the reddish tint I wanted now and the stock no longer looks like a piece of plywood that someone wiped a camel's butt with
Now to get a nice Russian Saiga 7.62x39 to go with the stock and convert it