• Mossberg Owners is in the process of upgrading the software. Please bear with us while we transition to the new look and new upgraded software.

workbench mods

John A.

Unconstitutional laws are not laws.
Staff member
Administrator
Global Moderator
I've been doing a lot more metal work in the last year or so, and am ready to add on to my Cummins 7x12 metal lathe.

While I do like the lathe, there is something that I have wanted for as long as I wanted a lathe.

A mill.

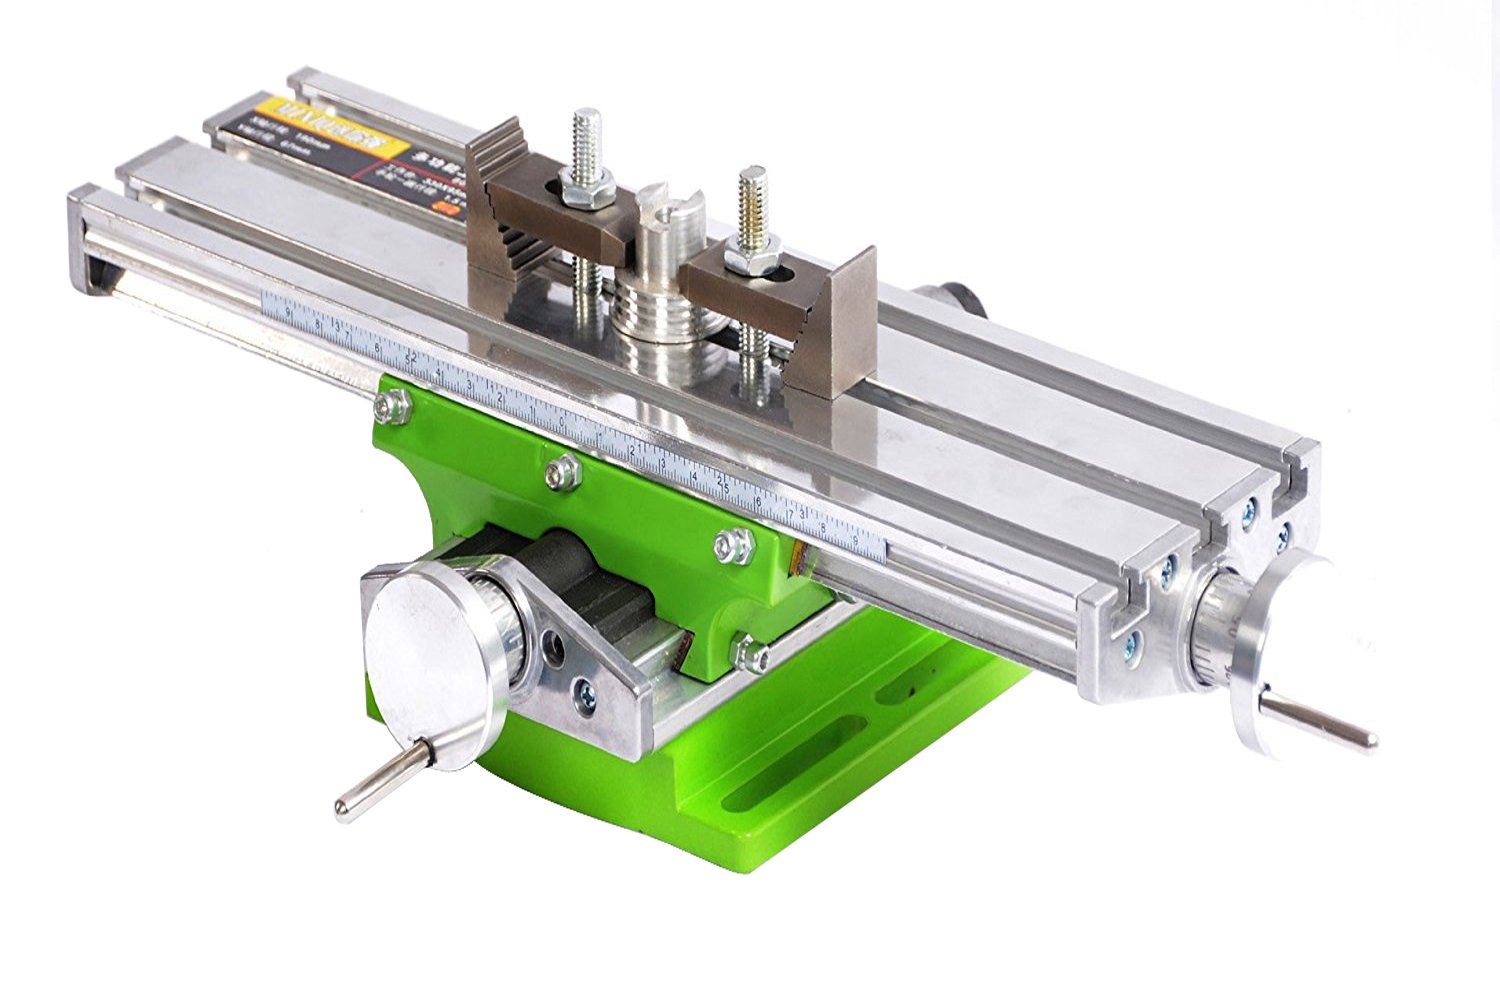
So, I am going to buy some pieces, and make some pieces, and I'm going to make a combo lathe/mill out of it. When I want to mill, I will drill and tap some threads so I can bolt the milling table on, and mill.

When I want to lathe, I'll unbolt the milling table and lay it to the side and lathe.

It's not going to be an industrial spec mill by any stretch of the imagination, but should do any milling task that I would take on. Perhaps some barrel fluting, some form 1 work for myself, complete an 80% lower, etc.

I'm also going to make a more sturdy bench or table than I am using. Currently, it's sitting on a 4x4 folding leg card table, which leaves a lot to be desired when working on heavy or unbalanced parts.

So, for the rest of the winter going into spring, this is going to by my project.

lathe mill combo 002.JPG
 
The card table really is a bit over stressed.

I bought a wooden build it yourself workbench kit from Harbor Freight for my gun bench. But for metalworking you want a metal bench.

I haven't seen a metal bench there that I would own.

I have a big 2.5 by 6 foot steel work table for my drill press and grinder and my medium vice. It came from an auction when an old paint shop closed down.

(The Way businesses have been going lately it seems this kind of stuff should be rather easy to find. We have tool auctions & Shop Auctions & business auctions here all the time.)

It was covered with paint and rust and I spent quite a while sanding it down making it clean and then I painted it. But it's a heavy GI issue work table. It was well worth the investment and labor to clean it up because ultimately I paid $25 for $500 industrial table.
 
I did better than a metal bench.

I took a 2x4, mounted it to the 12" thick reinforced concrete wall with 3 1/2 inch masonry screws, then screwed a countertop to it and made 2 legs and put in the front. Don't have the lathe set back on it yet and nothing is organized, but...it's solid

workbench 002.JPG
 
Yeah, that would be pretty sweet.

What I have in mind isn't quite as fancy.

71K16ehjGqL._SL1500_.jpg


contentonly.aspx


91Iycj7dZXL._SX522_.jpg


2705.480.jpg


80230.jpg
 
Got a shelf underneath of the bench now so I can store all my cutters and bits and tools without taking up all of my workspace.

lathe bench 005.JPG
 
Wood, the OTHER white metal... ;) It will do... Looks good! :)

I had a nice little Logan 10"x24" metal lathe circa 1944 I picked up from an ol' US Navy Machinist Mate. He was retiring and downsizing and it was a very clean unit with pan and legs. I welded up a base to tie the legs together so they were less "fragile". Someone offered me 3x what I had into it so away it went. Just wasn't quite big enough for gunsmithing. Down the road I'll be looking into something to be able to turn/thread barrels with.

I have a separate HF drill/mill that comes in quite handy. I'd prefer a big knee mill (ie: like a Bridgeport) but for now it will do.

I want to point out that the more massive (heavy) your equipment is, the less likely it will chatter or vibrate. That is why many people like the old iron... :)
 
Had a few extra minutes of down time today and cut out the 1/4" thick Aluminum angle and drilled and tapped several screws and attached it to my tool cradle.

mill 001.JPG

I had to notch it to remove the "bend" in the metal so it wouldn't interfere with true'ing it up. So, the easiest way to do that, was to cut out the material that would form around the tool holder. This is after I cut it, and before I squared it up.

mill 004.JPG

To give myself more clearance while working on the new attachment holes, I removed the tool post and the tool holder
mill 006.JPG

Then, drill and tap the new holes
mill 007.JPG

Once attached, time to check for square and true in multiple places (especially in the most important one)

mill 013.JPG

mill 015.JPG

mill 017.JPG

Next step will be to mount the milling table to the angle mount I just put in, and then attach the 4" vise. But even after I get the milling table, I'm going to have to take it apart and turn the cross slide handle around to the other side and put it all back together.

But I have to buy the milling table before any of that will happen, so tune in again next week to find out if the caped crusader will be able to pull it off, or if the evil villain will conquer the whole city. :ganster:
 
Following this very closely!!

How much useable area do anticipate across the bed once you install everything and fasten the endmill into the headstock?
 
All kinds.

The milling table should have 12" plus side to side movement, and I think 5 inches up and down from center (wherever that ends up being once I get it mounted).

Depth will be 7 inches or more total, though, we both know that won't ever be used in total. I don't even know if they make a milling bit that long or not.

The short answer, there will be enough side to side and up and down movement to do anything I will ever want it to do.

The milling table in the link below is the one I am going to get. I've researched many different ones, and there are some that are less expensive, but I've discovered they use plastic end tabs which probably wouldn't hold up well for milling on metal. This one, has aluminum ends, and should hold up a lot better to what I'll be using it for.

https://www.amazon.com/gp/product/B01MS1CL2H/ref=ox_sc_act_title_1?ie=UTF8&psc=1&smid=A2Z284YKGTY2KU

This milling table below is my favorite that I have found for the price, and I really considered it because it has 2 large guides to help reduce any slop or flex, but it's probably too big for my lathe, and it's also about 15 pounds.

https://www.amazon.com/AMYAMY-Compo...ie=UTF8&qid=1489694978&sr=8-8&keywords=amyamy
 
Yippee. Just checked my email and looks like the old 3 jaw chuck that came on the lathe when I first got it sold on ebay this morning. Only reason I changed it was the small spindle bore diameter wasn't big enough to pass through as much stuff as I'm able to do now and I had changed the chuck out. Since I have no reason to ever put it back on the lathe, I listed it to sale.

And it went for enough to cover the entire cost of the compound milling table I was going to order, so looks like the stars are aligning and I'm not going to have very much tied up in the mods after all. Less than $45, which is a lot better than $90 for everything I was needing.

3 jaw chuck 003.JPG

Used 3 jaw self centering lathe chuck.
Includes extra set of jaws and chuck tool.
Unsure what the maximum jaw width is, but the outside diameter of the chuck itself is 3.1".
Will fit most mini lathes including but not limited to:
cummins 5278
tools now 5278
grizzly g8688
micromark 82500
littlemachineshop 82500
homier 03911
harbor freight 33684
 
John, I looked at that same milling table when I looked for my cross slide vise. I wish I had gone with the table. I didn't think about it at the time but the vise is freaking heavy. I will have to weigh it but I was actually worried about it when it was mounted to my drill press. It also took up a lot of the working range of my benchtop drill press, which is why I was asking about your workspace.

I'm confused a little. Was the chuck center smaller then the spindle bore? How much of an increase were you able to gain by replacing the chuck.
 
Last edited:
The chuck center was smaller than the spindle bore. I think it was about a half inch through hole. Maybe a little more, but certainly not the .8"+ the new chuck has.

I have an xy vise for my drill, and it's heavy and takes up a lot of space too. Often times, takes up too much because I have trouble getting my drill bit over a tall part. I couldn't mount it on my drill base. I had to resort to mounting to it to the table top itself.

And is some of the reason why I'm going a different route with the lathe mill. I won't have any problem with not having enough depth room on the lathe, but I don't necessarily want a 20 pound weight hanging off the front side of my carriage either. I believe the compound table I am getting is about 5 or 6 pounds, plus another pound or so with the clamp/vise so it's maybe 1/3 of the weight if the specs in the product description is right.

I will be buying some aluminum plate that is about 1-3/4" wide so I can add depth to the jaws of the vise, and will also mill a line across the center so it will hold tubes and barrels and "round" items securely and effectively. But that's a simple 15 minute job.
 
The carriage stop, which I am going to use for a depth stop for the mill, was delivered this morning.

I am going to exchange the through-bolt for a longer one. But I think you get the jist of what it is and does.

carriage stop 003.JPG
 
I got the last of the parts order.

The milling table is going to work out GREAT !!!

I was able to take the top of it apart and reverse the side the handle is on very easily.

mill 002.JPG

mill 004.JPG

Marked and drilled the bolt holes to mount it on the aluminum

mill 007.JPG

While making sure there is enough clearance everywhere. Yes, even the bottom, and perhaps especially the bottom.

mill 014.JPG

Once positioned, there is plenty of movement. Depending on where I mount the 4" clamp tomorrow (it can be placed anywhere on the milling table).

I can get more up/down movement than the lathe is even capable of.

mill 018.JPG

Left/right side movement can also be increased by not only moving the wheel on the milling table, but I can get an extra 4 1/2" of travel by using the lathes carriage and cranking the entire assembly farther over even though I didn't really get a great picture of that.

mill 022.JPG

mill 023.JPG

I believe this is going to work really well for me.

I need a few more bolts to mount the 4" vise to the milling table, which I'll probably pick up tomorrow, but I'm excited to try this out on something. I'm thinking maybe do some lightening cuts on my 300 blackout bolt maybe?

Perhaps flute my 357 pardner barrel once I practice a little to ensure that all the movements are straight and such?

I am well pleased so far with how this project is turning out. I'm looking forward to making some chips with it soon.
 
That looks awesome John. Can't wait to see what you can do with it.
 
Yeah that's looking really great!

I expect to see piles of chips from the maiden voyage. ;)
 
Back
Top